Codetown
Codetown ::: a software developer's community
Kotlin Thursdays: Kotlin and Spring Boot
Kotlin and Spring Boot
This week we examine Kotlin and Spring Boot. In the past, I've worked frontend for Spring JPA, but this is my first time working with pipelining a framework from the ground-up. Spring's frameworks are widely used in the industry as the de-facto standard for web application development. If there are any issue following this tutorial be sure to let me know!
The aim for this segment is to create a personalized live-stream for Twitter updates from Kotlin sources as well as trackers for new Github releases on Kotlin libraries as well as issues being tracked on those libraries! This week, we start with the builder, and worry about authentication, deployment, and mock testing next week.
Spring became particularly popular 2003, thanks to Spring's popular framework features:
- Instead of extending or implementing application-specific code, Java developers can use POJOs
- Developers can write code without being concerned whether it's remote or local
- Code doesn't need to be concerned with JDBC boilerplating anymore
- Spring utilizes Aspect-Oriented Programming (AOP) to separate concerns regarding transaction handling, messaging, and logging.
- Code can be tested standalone
- The code can be application-server agnostic
We focus on Spring Boot, which needs very little spring configuration and offers project initializations from the website itself, and takes an opinionated view of the Spring platform and third-party libraries so you can get started with minimum fuss. Spring Boot offers further neater features for quick start-up:
Create stand-alone Spring applications
Embed Tomcat, Jetty or Undertow directly (no need to deploy WAR files)
Provide opinionated 'starter' dependencies to simplify your build configuration
Automatically configure Spring and 3rd party libraries whenever possible
Provide production-ready features such as metrics, health checks and externalized configuration
Absolutely no code generation and no requirement for XML configuration
Resources
- Spring Data JPA: https://docs.spring.io/spring-data/jpa/docs/current/reference/html/#reposit...
- JUnit 5 Testing: https://junit.org/junit5/docs/current/user-guide/#writing-tests-tes...
- Mustache Templating: https://mustache.github.io/mustache.5.html
- Gradle: https://docs.gradle.org/current/userguide/userguide.html
- Kotlin: https://kotlinlang.org/docs/reference/
Topics covered:
- Kotlin: Optional parameters in modeling, getting model attributes, IntelliJ Spring setup, writing your first Kotlin (REST) controller
- Spring Boot: project initialization, Gradle setup, JUnit testing components, HTTP templating, Repositories and Entities
This project is available for complete referencing via this github repository.
Quickstart with SpringBoot
1. Go to https://start.spring.io/#!language=kotlin for a quickstart with Initializer and choose the following configuration options so everything can be neatly packaged in a .zip file.
2. Choose Gradle build system, "blog" artifact, "blog" package name (in advanced settings) and also add "Web", "Mustache", "JPA" and "H2" dependencies as starting points, then click on "Generate Project".
Once the project is downloaded, open the project through IntelliJ! The build for Gradle should already be there.
If you open build.gradle, you'll notice that the spring-boot-grade-plugin as well as kotlin-gradle-plugin is available for you. The dependencies also includes your h2database options (to be covered for next week), kotlin configuration setup, and the spring-boot-starters for data-jpa, mustache, and web.
As a quick note, you're going to need to install the mustache plugin for IntelliJ! This can be found by navigating to Preferences > Plugins and clicking Install JetBrains plugin... at the bottom.
We're good to go!
Writing the Basic Spring Infrastructure
We're now going to create classes for the application itself, a RESTController, our basic models, and test them with JUnit 5. As a rule, anything that's written in your web application should be tested. We're going to start light on the testing with components for the purpose of this tutorial, as we have many topics left to cover, but in the next segment, we will go more into testing as well as splitting up domains into more than one microservice (and more).
More or less, the following diagram below is the the kind of bare-bones infrastructure we're trying to shoot for. This diagram will be helpful to keep in mind, since we are not focused on any kind of MVC, MV**, or other kind of family at the moment.
My experience was that I was better off placing the main function outside of the class itself, and that all the beans goes in the class. You'll notice the annotation for @SpringBootApplication - this annotation is one of many features of Spring Boot that allows configurations to be significantly easier. Using @SpringBootApplication is equivalent to
@Configuration: allow to register extra beans in the context or import additional configuration classes@EnableAutoConfiguration: enable Spring Boot's auto-configuration mechanism@ComponentScan: enable@Componentscan on the package where the application is located
We also write an HtmlController intended to handle actions between the model and the view. You'll notice that this annotation used below is in reference to @Controller only, and considering Spring also has @RestController, let's look at the differences:
@Controlleris used to mark classes as Spring MVC Controller.@RestControlleris a convenience annotation that does nothing more than adding the@Controllerand@ResponseBodyannotations
main/kotlin/com.example.demo/KotlinFeederApplication.kt
@SpringBootApplication
class KotlinFeederApplication {
}
fun main(args: Array/span>String>) {
runApplication(*args) {
setBanner(Banner.Mode.OFF)
}
}
@Controller
class HtmlController {
@GetMapping main("/")
fun app(model: Model): String {
// instead of model.addAttribute("title", "Application"), Kotlin allows:
model["title"] = "Kotlin Stream"
}
}
We write a corresponding mustache file for HTML templating. Mustache can be used for HTML, config files, and source code. It works by expanding tags in a template using values provided in a hash or object. It is largely "logic-less" because there are no conditional statements or looping, only tags. You'll want to include these templates in resources. If you wish to customize these templates with separate static files later on, you're welcome to include them in a static resources for resources and import these files as you would with any HTML document.
main/resources/templates/header.mustache
span style="color: #22863a;">html>
span style="color: #22863a;">head>
span style="color: #22863a;">link rel="stylesheet" href="/styles.css">
</head>
span style="color: #22863a;">body>
main/resources/templates/app.mustache
{{header}}
span style="color: #22863a;">h1>{{title}}</h1>
{{footer}}
main/resources/templates/footer.mustache
</body>
</html>
We will have to render the markdown through the use of beans in our application. A "bean" is an object that is instantiated by an IoC container. Beans, and the dependencies among them, are reflected in the configuration metadata used by a container. In Spring, the objects the form the backbone of the application are managed with these beans.
We shall use the Commonmark library, a standard, unambiguous syntax specification for Markdown, along with a suite of comprehensive tests to validate Markdown implementations against this specification. We shall include this in our build.gradle.
build.gradle
buildscript {
dependencies {
classpath("com.atlassian.commonmark:commonmark:0.11.0")
classpath("com.atlassian.commonmark:commonmark-ext-autolink:0.11.0")
}
}
We create a Markdown bean though a @Service.
main/kotlin/com.example.demo/MarkdownConverter.kt@Service(SpringExtension::class)
@SpringBootTest
class MarkdownConverter : (String?) -> String {
private val parser = Parser.builder( ).extensions(listOf(AutolinkExtension.create( ))).build( )
private val renderer = HtmlRenderer.builder( ).build( )
println(">> Setup")
}
override fun invoke(input: String?): String {
if (input == null || input == "") {
return""
}
return renderer== null .render(parser.parse(input))
}
}
We will have to add the mustache compiler bean to the application class as well.
main/kotlin/com.example.demo/KotlinFeederApplication.kt@SpringBootApplication
class KotlinFeederApplication {
@Bean
fun mustacheCompilier(loader: Mustache.TemplateLoader?) =
Mustache.compilier( ).escapeHTML(false).withLoader(loader)
}
fun main(args: Array/span>String>) {
runApplication(*args) {
setBanner(Banner.Mode.OFF)
}
}
JUnit Testing with Kotlin
Writing tests with JUnit can be useful - as you make incremental changes to your code, you can continuously run these tests to make sure the additions or changes you make doesn't break what you've already written. Because the initializer comes with JUnit 4, you'll want to switch to JUnit 5, which provides features specifically for Kotlin we'll find useful, especially with annotations found in the Jupiter API.
In your terminal, you'll want to check what version you're using with ./gradlew --version in your project file. If it is less than 4.7, you'll want to update it with ./gradlew wrapper --gradle-version 4.7 and add test { useJUnitPlatform() } to your build.gradle.
When you write your testing for your JUnit testing, you'll want to use real sentences between backticks instead of camel-case to provide expressive test function names.
In JUnit 5, you can use the @ExtendWith tag to declare on a testing interface so that classes that implement the interface automatically inherit its tags and extensions. Real-world examples uses SpringExtension::class so that a developer can integrate the Spring TestContext Framework into JUnit 5's Jupiter programming model.
As mentioned previously, you can run/test your code in Spring Boot without being concerned whether the environment the code is running in is local or remote. @SpringBootTest(webEnvironment = SpringBootTest.WebEnvironment.RANDOM_PORT) annotation can be specified on a test class that runs Spring Boot based tests.
@ExtendWith(SpringExtension::class)
@SpringBootTest(webEnvironment = SpringBootTest.WebEnvironment.RANDOM_PORT)
class IntegrationTests (@Autowired val restTemplate : TestRestTemplate) {
@BeforeAll
fun setup( ) {
println(">> Setup")
}
@Test
fun `Assert application page title, content and status code`( ) {
val entity = restTemplate.getForEntityspan style="color: #d73a49;">String>("/")
assertThat(entity.statusCode).isEqualTo(HttpStatus.OK)
assertThat(entity.body).contains("< h1 class="app-title">Kotlin Stream</h1 >")
}
@AfterAll
fun teardown( ) {
println(">> Tear down")
}
To run your testing, right-click the class and click "Run {test class}". Granted that your tests passes, Let's go ahead and run the application itself locally - to do so, right-click the main function in the Application class and click "Run" for the instance.
Go to your localhost:8080 on your browser to view the following result:
Working with Kotlin JPA
To be able to use Kotlin immutable model classes in Spring JPA, we must enable the Kotlin plugin for JPA in out build.gradle.
build.gradle
buildscript {
dependencies {
classpath("org.jetbrains.kotlin:kotlin-noarg:${kotlinVersion}")
}
}
apply plugin: 'kotlin-jpa'
After your build.gradle refreshes, create a Model class to write your entities.
Entities are the persistence layer of the code. In Kotlin, optional parameters with default values at the ending position(s) makes the parameters optional in the models. Since we're creating a stream intended for websocket usage, I'd like to display them in the form of Cards. Later on, we intend on users being able to connect their twitter and github to personalize their stream, so we'll go ahead and stick Users in our entities as well.
main/kotlin/com.example.demo/Model.kt
@Entity
data class Card(
val title: String,
val headline: String,
val content: String,
@ManyToOne @JoinColumn val author: User,
@Id @GeneratedValue val id: Long? = null,
val addedAt: LocalDateTime = LocalDateTime.now( )
}
@Entity
data class User(
@Id val login: String,
val firstname: String,
val lastname: String,
val description: String? = null,
}
In Kotlin, data classes, some standard functionality and utility functions are often mechanically derivable from the data models we create. The compiler automatically derives the following property members declared in the primary constructor such as:
equals()/hashCode()pairtoString()of the form"User(name=John, age=42)"componentN()functions corresponding to the properties in their order of declaration;copy() function
With our model classes defined, we create an abstract repository abstraction layer responsible for managing our entity classes. In the Spring JPA Module, the central interface in the Spring Data repository abstraction is called Repository. It manages the domain classes as well as domain-class type arguments. The interface acts primarily as a marker interface to capture the types to work with and to help discover interfaces that extend Repository.
CrudRepository provides sophisticaed CRUD functionality for the entity class being managed.
For those that might be familiar with SQL queries, you'll notice similarities to SQL-like calls being made in the function below for the CardRepository. Query methods are declared in the interface. The repository may be derive a store-specific query either by:
- deriving the query from the method name directly
- using a manually defined query.
The query builder mechanism in the Spring Data repository infrastructure strips the prefixes find...By, read...By, count...By, and get...By from the method and starts parsing the rest of it. The first By acts as a delimiter to indicate the start of query criteria.
You can define conditions on the entity properties and concatenate them with And and Or.You may also use Between, LessThan, GreaterThan, or IgnoreCase(...).You can use OrderBy to the query method by providing some direction (Asc or Desc).
To use multiple properties without being ambiguous, use _ between entity properties.
main/kotlin/com.example.demo/Repositories.kt
interface CardRepository : CrudRespositoryspan style="color: #6f42c1;">Card, Long> {
fun findAllByOrderByAddedAtDesc( ): Iterable
}
interface UserRepository : CrudRespositoryspan style="color: #6f42c1;">User, String>
We must render these models by using these repositories in our HtmlController.
main/kotlin/com.example.demo/KotlinFeederApplication.kt
@SpringBootApplication
class KotlinFeederApplication {
}
fun main(args: Array/span>String>) {
runApplication(*args) {
setBanner(Banner.Mode.OFF)
}
}
@Controller
class HtmlController (private val repository: CardRepository,
private val markdownConverter: MarkdownConverter ) {
@GetMapping ("/")
fun app(model: Model): String {
// instead of model.addAttribute("title", "Application"), Kotlin allows:
model["title"] = "Kotlin Stream"
}
@GetMapping ("/card/{id}")
fun card(@PathVariable id: Long), model: Model): String {
val card = repository.findById(id)
.orElseThrow { IllegalArgumentException("Wrong card id") }
.render( )
model["title"] = card.title
model["card"] = card
return card
}
fun Card.render = RenderedCard(
title,
markdownConverter.invoke(headline),
markdownConverter.invoke(content),
author,
id,
addedAt.format( ),
)
data class RenderedCard(
val title: String,
val headline: String,
val content: String,
val author: User,
val id: Long?,
val addedAt: String,
)
}
Now that we have our models with rendering capabilities, we can add card templating to our template files for both the cards themselves and the cards rendered at routing.
main/resources/templates/app.mustache
{{header}}
span style="color: #22863a;">div class="title-header">
span style="color: #6f42c1;">img src="https://upload.wikimedia.org/wikipedia/commons/thumb/7/74/Kotlin-logo.svg/2000px-Kotlin-logo.svg.png" class="kotlin-logo"/>
span style="color: #22863a;">h1 class='app-title'> {{title}} </h1>
<div>
span style="color: #22863a;">div class="container">
span style="color: #22863a;">p style="padding-left: 2em">span style="color: #22863a;">div class="feeder">
{{#cards}}
span style="color: #22863a;">div class="card">
span style="color: #22863a;">section>
span style="color: #22863a;">header class="card-header">
span style="color: #22863a;">h2 class="card-title">
span style="color: #22863a;">a href="/card/{{id}}">{{title}}
</h2>
span style="color: #22863a;">div class="card-meta">
By span style="color: #22863a;">strong>{{author.firstname}}</ strong>, span style="color: #22863a;">strong>
{{addedAt}}</ strong>
</ div>
</ header
span style="color: #22863a;">div class="card-description">
{{headline}}
</ div>
</ section>
</ div>
{{/cards}}
</div>
</div>
{{footer}}
main/resources/templates/card.mustache
{{header}}
span style="color: #22863a;">section class='card'>>
span style="color: #22863a;">header class='card-header'>>
span style="color: #22863a;">h1 class='card-title'>>{{card.title}}</h1>
span style="color: #22863a;">p class='card-meta'>>By span style="color: #22863a;">strong>{{card.title}}</ strong>, on span style="color: #22863a;">strong>{{card.addedAt}}</ strong></p>
</ header
span style="color: #22863a;">div class='card-description'>>
{{card.headline}}
{{card.content}}
</ div>
{{footer}}
Last but not least, we'll need to create a bean in our application to create some initial fake data.
main/kotlin/com.example.demo/KotlinFeederApplication.kt@SpringBootApplication
class KotlinFeederApplication {
@Bean
fun mustacheCompilier(loader: Mustache.TemplateLoader?) =
Mustache.compilier( ).escapeHTML(false).withLoader(loader)
@Bean
fun databaseInitializer(userRepository: UserRepository,
cardRepository: CardRepository) = CommandLineRunner {
val smaldini = User("smaldini", "Stéphane", "Maldini")
userRepository.save(smaldini)
cardRepository.save(Card(
"Reactor Bismuth is out",
"Lorem ipsum",
"dolor **sit** amet https://projectreactor.io/",
smaldini,
1
))
cardRepository.save(Card(
"Reactor Aluminium has landed",
"Lorem ipsum",
"dolor **sit** amet https://projectreactor.io/",
smaldini,
2
))
}
}
fun main(args: Array/span>String>) {
runApplication(*args) {
setBanner(Banner.Mode.OFF)
}
}
If you rerun the instance for the application, you should see something like this:
Add some css to your static file in resources as you wish for better customization:
Next week
We'll need to add routing for clicking these specific cards and we have plenty more to do after: We'll need to test our HttpAPI, we'll need to start with Twitter/Github Authentication, and we may be looking at reorganizing our application a little bit for our own sakes. Lastly, we'll need to implement websockets to get that live-feed we're looking for! Stay tuned.
Views: 987
Happy 10th year, JCertif!
Notes
Welcome to Codetown!
 Codetown is a social network. It's got blogs, forums, groups, personal pages and more! You might think of Codetown as a funky camper van with lots of compartments for your stuff and a great multimedia system, too! Best of all, Codetown has room for all of your friends.
Created by Michael Levin Dec 18, 2008 at 6:56pm. Last updated by Michael Levin May 4, 2018.
Looking for Jobs or Staff?
Check out the Codetown Jobs group.
InfoQ Reading List
Java News Roundup: Hardwood 1.0, Endive 1.0, Azul Payara, Quarkus, WildFly, LangChain4j, OSSI

This week's Java roundup for June 22nd, 2026, features news highlighting: the GA releases of Hardwood 1.0 and Endive 1.0; the June 2026 edition of Azul Payara; point releases of Quarkus, LangChain4j; the first beta release of WildFly 41; and introducing Eliya JDK and the Open Source Sustainability Initiative (OSSI), the latter of which was founded by HeroDevs and Commonhaus Foundation.
By Michael RedlichEliya 25 Brings a JVM-Level Diagnostic Profile to OpenJDK 25 LTS

Asymm Systems has released Eliya 25.0.3, an OpenJDK 25 LTS distribution aimed at improving production diagnostics in Java environments. It consolidates several HotSpot features into an opt-in Production profile. Eliya is designed for teams needing reliable diagnostic data, especially in regulated settings. Future enhancements are planned for Phase 2.
By A N M Bazlur RahmanInside Target’s LLM-Based System for Semantic Matching in Marketing Forecast Pipelines
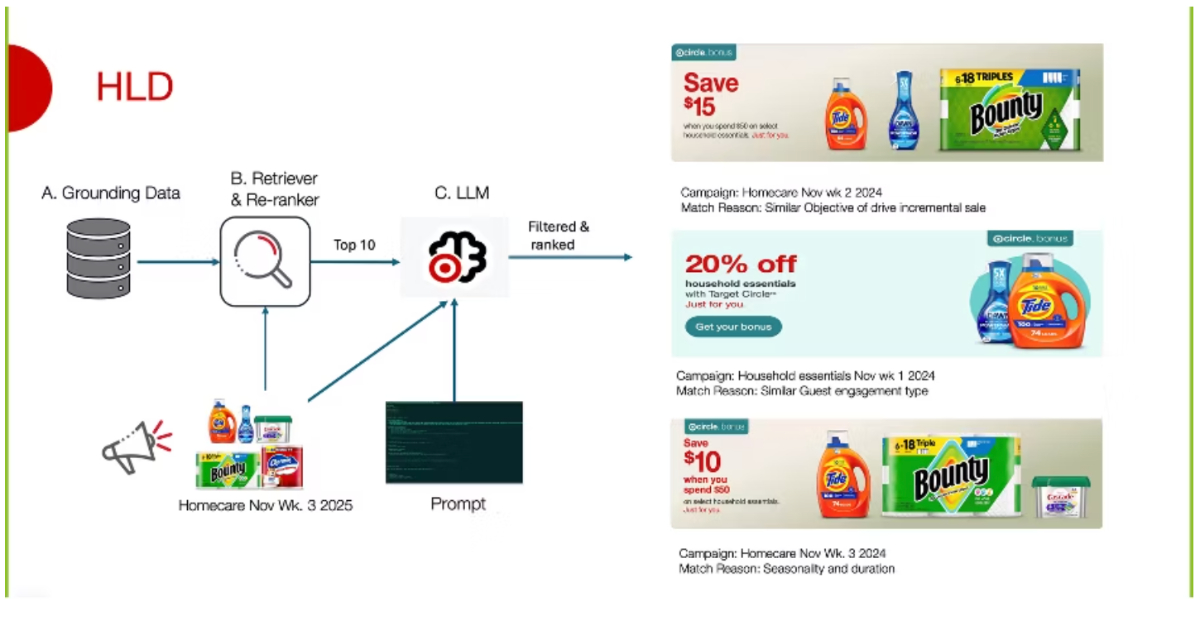
Target built a generative AI system to improve marketing campaign forecasting by retrieving and ranking similar historical campaigns. Using embeddings, vector search, and LLM ranking, it replaces rule-based workflows. Evaluation shows 75% top-1 and 100% top-3 coverage. The system reduces manual effort, improves consistency, and uses feedback loops to refine retrieval using campaign outcomes.
By Leela KumiliPresentation: Million PDFs: Building a Modern Document Infrastructure with Rust and Typst

Erik Steiger discusses the operational pain of legacy PDF generation in regulated banking and manufacturing. He explains how transitioning from resource-heavy engines like Puppeteer and LaTeX to a serverless Rust architecture powered by Typst can drop render latencies below 2ms. He shares how applying Git and Docker concepts to template registries ensures ironclad compliance and rapid debugging.
By Erik SteigerPodcast: Architectural Patterns: Moving Beyond Cloud-Native to Local-First - Insights from Adam Wiggins
In this episode, Heroku co-founder and Ink & Switch founder Adam Wiggins argues for a 'local-first' architecture that reconciles cloud-based collaboration with the performance and data ownership of local software. He explores the role of CRDTs and version control primitives in non-code domains, and examines how a hybrid AI future might leverage local models for core productivity tasks.
By Adam Wiggins
© 2026 Created by Michael Levin.
Powered by
![]()